- Published on
6 Incredibly Easy Ways To Make A Tabs With Tailwind CSS Better While Spending Less
- What is Tailwind CSS?
- The description of Tabs UI component
- Why use Tailwind CSS to create a Tabs UI component?
- The preview of Tabs UI component
- The source code of Tabs UI component
- How to create a Tabs with Tailwind CSS?
- 1. Use the "flex" utility class
- 2. Use the "border-b" utility class
- 3. Use the "hover:bg-gray-100" utility class
- 4. Use the "active:bg-white" utility class
- 5. Use the "hidden" utility class
- 6. Use the "transition" utility class
- Conclusion
Are you looking for a way to create a Tabs UI component for your website or web application? Look no further than Tailwind CSS, the popular utility-first CSS framework that can help you create stunning user interfaces quickly and easily.
In this article, we'll explore what Tailwind CSS is, why it's a great choice for creating Tabs UI components, and provide you with six incredibly easy ways to make your Tabs UI component even better while spending less time and effort.
What is Tailwind CSS?
Tailwind CSS is a utility-first CSS framework that provides a set of pre-defined CSS classes that you can use to style your HTML elements. It's designed to help you create responsive, mobile-first user interfaces quickly and easily, without having to write custom CSS code.
Tailwind CSS is based on a modular design, which means that you can use only the classes that you need, and leave out the rest. This makes it a lightweight and flexible framework that can be customized to fit your specific needs.
The description of Tabs UI component
A Tabs UI component is a user interface element that allows users to switch between different sections of content within a single page or application. Tabs are commonly used in web applications to organize content into logical groups, such as navigation menus, settings pages, and product catalogs.
A Tabs UI component typically consists of a set of tabs that are displayed horizontally or vertically, and a content area that displays the content associated with the currently selected tab. When a user clicks on a tab, the content area updates to display the content associated with that tab.
Why use Tailwind CSS to create a Tabs UI component?
Tailwind CSS is an excellent choice for creating Tabs UI components for several reasons:
Pre-defined classes: Tailwind CSS provides a set of pre-defined classes that you can use to style your Tabs UI component quickly and easily. This saves you time and effort compared to writing custom CSS code from scratch.
Responsive design: Tailwind CSS is designed to create responsive, mobile-first user interfaces. This means that your Tabs UI component will look great on any device, whether it's a desktop computer, tablet, or smartphone.
Modular design: Tailwind CSS is based on a modular design, which means that you can use only the classes that you need, and leave out the rest. This makes it a lightweight and flexible framework that can be customized to fit your specific needs.
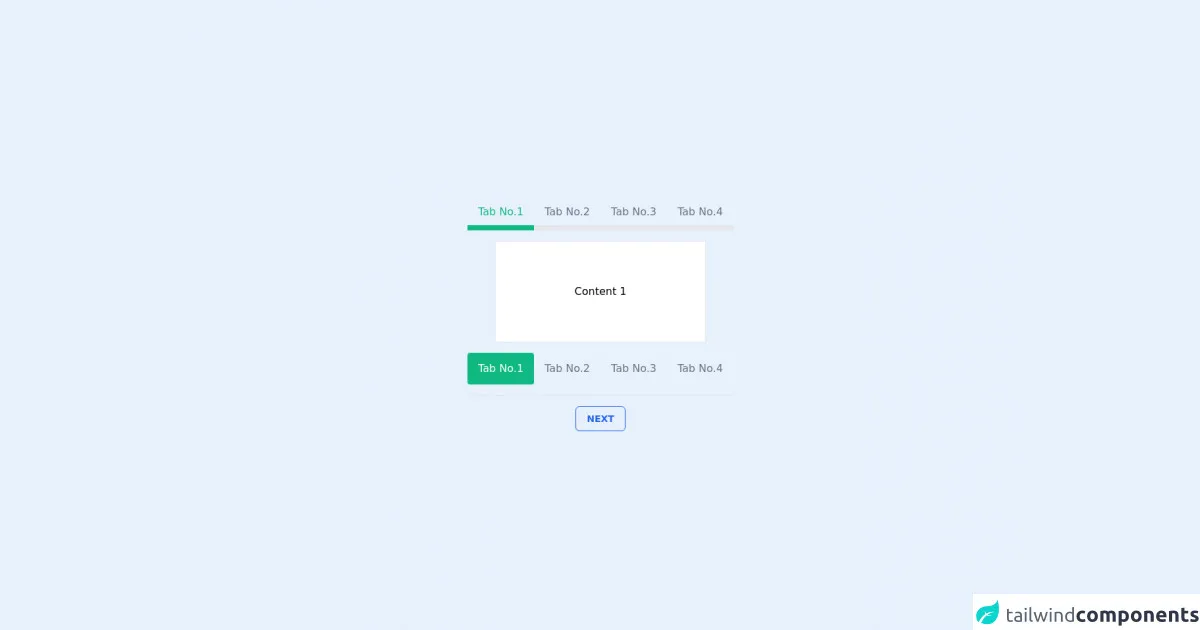
The preview of Tabs UI component
Tabs UI components can be styled in many different ways using Tailwind CSS. Here's a preview of what your Tabs UI component could look like:
Free download of the Tabs's source code
The source code of Tabs UI component
Creating a Tabs UI component with Tailwind CSS is easy. Here's an example of the HTML and CSS code that you can use to create a basic Tabs UI component:
<!--
Author: Mostafa Ahangarha
License: MIT
Version: v1.1
-->

<script src="https://cdn.jsdelivr.net/gh/alpinejs/alpine@v2.x.x/dist/alpine.min.js" defer></script>

<div class="flex justify-center items-center h-screen">
	<!--actual component start-->
	<div x-data="setup()">
		<ul class="flex justify-center items-center my-4">
			<template x-for="(tab, index) in tabs" :key="index">
				<li class="cursor-pointer py-2 px-4 text-gray-500 border-b-8"
					:class="activeTab===index ? 'text-green-500 border-green-500' : ''" @click="activeTab = index"
					x-text="tab"></li>
			</template>
		</ul>

		<div class="w-80 bg-white p-16 text-center mx-auto border">
			<div x-show="activeTab===0">Content 1</div>
			<div x-show="activeTab===1">Content 2</div>
			<div x-show="activeTab===2">Content 3</div>
			<div x-show="activeTab===3">Content 4</div>
		</div>

		<ul class="flex justify-center items-center my-4">
			<template x-for="(tab, index) in tabs" :key="index">
				<li class="cursor-pointer py-3 px-4 rounded transition"
					:class="activeTab===index ? 'bg-green-500 text-white' : ' text-gray-500'" @click="activeTab = index"
					x-text="tab"></li>
			</template>
		</ul>

		<div class="flex gap-4 justify-center border-t p-4">
			<button
				class="py-2 px-4 border rounded-md border-blue-600 text-blue-600 cursor-pointer uppercase text-sm font-bold hover:bg-blue-500 hover:text-white hover:shadow"
				@click="activeTab--" x-show="activeTab>0"
				>Back</button>
			<button
				class="py-2 px-4 border rounded-md border-blue-600 text-blue-600 cursor-pointer uppercase text-sm font-bold hover:bg-blue-500 hover:text-white hover:shadow"
				@click="activeTab++" x-show="activeTab<tabs.length-1"
				>Next</button>
		</div>
	</div>
	<!--actual component end-->
</div>

<script>
	function setup() {
    return {
      activeTab: 0,
      tabs: [
          "Tab No.1",
          "Tab No.2",
          "Tab No.3",
          "Tab No.4",
      ]
    };
  };
</script>

<!--
# Changelog:

## [1.1] - 2021-05-01
### Added
 - Back/Next buttons

## [1.0] - 2021-05-01
### Added
 - Nav bar with two styles
 - Set tabs title dynamically and render on page
-->
How to create a Tabs with Tailwind CSS?
Now that you know why Tailwind CSS is a great choice for creating Tabs UI components, let's dive into six incredibly easy ways to make your Tabs UI component even better while spending less time and effort.
1. Use the "flex" utility class
The "flex" utility class is a powerful tool that you can use to create flexible layouts for your Tabs UI component. By adding the "flex" class to your Tabs container element, you can make the tabs expand to fill the available space, regardless of the width of the content inside them.
<div class="flex">
  <!-- Tabs go here -->
</div>
2. Use the "border-b" utility class
The "border-b" utility class adds a bottom border to an element, which is perfect for separating the tabs from the content area in your Tabs UI component. By adding the "border-b" class to your Tabs container element, you can create a clean and professional-looking design.
<div class="flex border-b">
  <!-- Tabs go here -->
</div>
3. Use the "hover:bg-gray-100" utility class
The "hover:bg-gray-100" utility class adds a light gray background color to an element when the user hovers over it with their mouse. By adding this class to your Tabs tabs, you can create a subtle visual cue that indicates to the user that the tab is clickable.
<div class="flex border-b">
  <div class="hover:bg-gray-100">Tab 1</div>
  <div class="hover:bg-gray-100">Tab 2</div>
  <div class="hover:bg-gray-100">Tab 3</div>
</div>
4. Use the "active:bg-white" utility class
The "active:bg-white" utility class adds a white background color to an element when it's in an active state, such as when the user clicks on a tab. By adding this class to your Tabs tabs, you can create a clear visual indication of which tab is currently selected.
<div class="flex border-b">
  <div class="hover:bg-gray-100 active:bg-white">Tab 1</div>
  <div class="hover:bg-gray-100 active:bg-white">Tab 2</div>
  <div class="hover:bg-gray-100 active:bg-white">Tab 3</div>
</div>
5. Use the "hidden" utility class
The "hidden" utility class allows you to hide an element from view, which is useful for hiding the content area associated with a tab that's not currently selected. By adding the "hidden" class to your content area elements, you can create a clean and uncluttered design.
<div class="flex border-b">
  <div class="hover:bg-gray-100 active:bg-white">Tab 1</div>
  <div class="hover:bg-gray-100 active:bg-white">Tab 2</div>
  <div class="hover:bg-gray-100 active:bg-white">Tab 3</div>
</div>

<div class="hidden">Content for Tab 1 goes here</div>
<div class="hidden">Content for Tab 2 goes here</div>
<div class="hidden">Content for Tab 3 goes here</div>
6. Use the "transition" utility class
The "transition" utility class allows you to add smooth transitions to your Tabs UI component, which can create a more polished and professional-looking design. By adding the "transition" class to your Tabs container element, you can create a smooth transition when the user clicks on a tab.
<div class="flex border-b transition">
  <div class="hover:bg-gray-100 active:bg-white">Tab 1</div>
  <div class="hover:bg-gray-100 active:bg-white">Tab 2</div>
  <div class="hover:bg-gray-100 active:bg-white">Tab 3</div>
</div>
Conclusion
Creating a Tabs UI component with Tailwind CSS is easy and fun. By following the six tips outlined in this article, you can create a stunning Tabs UI component that looks great on any device, while spending less time and effort. So why not give it a try today?