- Published on
A Complete Guide To Build A Dropzone With Tailwind CSS
- What is Tailwind CSS?
- The description of Dropzone ui component
- Why use Tailwind CSS to create a Dropzone ui component?
- The preview of Dropzone ui component
- The source code of Dropzone ui component
- How to create a Dropzone with Tailwind CSS?
- Step 1: Create the HTML structure
- Step 2: Add the Dropzone classes
- Step 3: Add the file input element
- Step 4: Add the JavaScript functionality
- Conclusion
What is Tailwind CSS?
Tailwind CSS is a utility-first CSS framework that provides a set of pre-defined classes to help you quickly build custom user interfaces. Unlike other CSS frameworks, Tailwind CSS does not come with pre-built components, but instead focuses on providing a flexible set of building blocks that can be combined to create any design.
The description of Dropzone ui component
A Dropzone is a user interface component that allows users to drag and drop files from their computer onto a designated area on a web page. Once the files are dropped, they can be uploaded to a server for processing or storage. Dropzones are commonly used in file-sharing applications, content management systems, and other web applications that require file uploads.
Why use Tailwind CSS to create a Dropzone ui component?
Tailwind CSS provides a set of pre-defined classes that can be used to quickly build a Dropzone component. These classes can be easily customized to match the design of your application, and the utility-first approach of Tailwind CSS makes it easy to create responsive and accessible user interfaces.
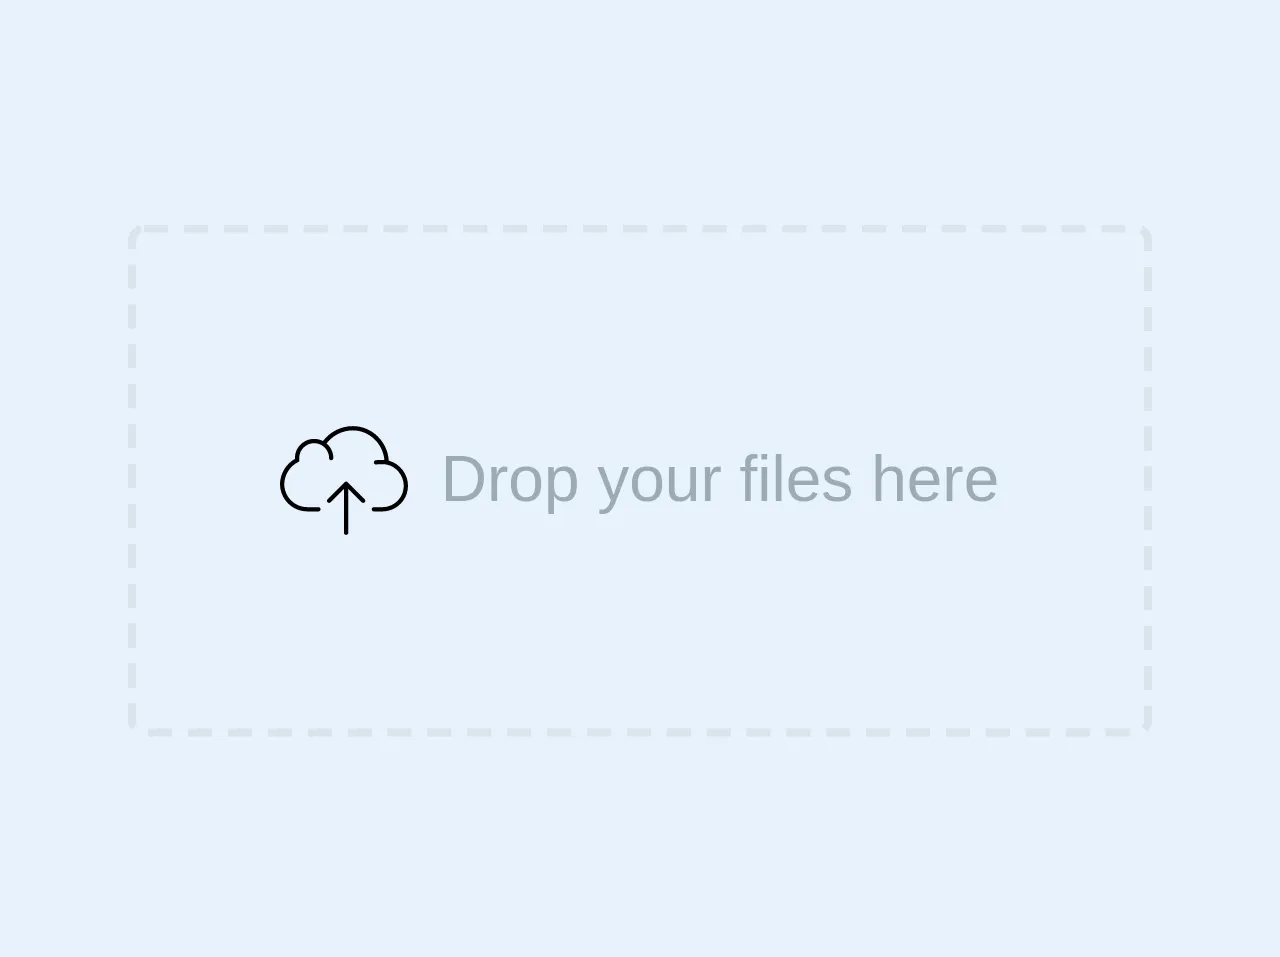
The preview of Dropzone ui component
To create a Dropzone with Tailwind CSS, we will use a combination of HTML and CSS classes. The resulting component will look something like this:
Free download of the Dropzone's source code
The source code of Dropzone ui component
To create the Dropzone component, we will use the following HTML and CSS classes:
<div class="border-dashed border-2 w-64 h-32 rounded flex justify-center items-center">
  <svg version="1.1" class="h-8 text-grey mr-2" xmlns="http://www.w3.org/2000/svg" xmlns:xlink="http://www.w3.org/1999/xlink"
	 viewBox="0 0 60 60" style="enable-background:new 0 0 60 60;" xml:space="preserve">
<g>
	<path d="M50.975,20.694c-0.527-9-7.946-16.194-16.891-16.194c-5.43,0-10.688,2.663-13.946,7.008
		c-0.074-0.039-0.153-0.065-0.228-0.102c-0.198-0.096-0.399-0.188-0.605-0.269c-0.115-0.045-0.23-0.086-0.346-0.127
		c-0.202-0.071-0.406-0.133-0.615-0.19c-0.116-0.031-0.231-0.063-0.349-0.09c-0.224-0.051-0.452-0.09-0.683-0.124
		c-0.102-0.015-0.202-0.035-0.305-0.047C16.677,10.523,16.341,10.5,16,10.5c-4.962,0-9,4.037-9,9c0,0.129,0.007,0.255,0.016,0.381
		C2.857,22.148,0,26.899,0,31.654C0,38.737,5.762,44.5,12.845,44.5H18c0.552,0,1-0.447,1-1s-0.448-1-1-1h-5.155
		C6.865,42.5,2,37.635,2,31.654c0-4.154,2.705-8.466,6.432-10.253L9,21.13V20.5c0-0.123,0.008-0.249,0.015-0.375l0.009-0.175
		l-0.012-0.188C9.007,19.675,9,19.588,9,19.5c0-3.859,3.14-7,7-7c0.309,0,0.614,0.027,0.917,0.067
		c0.078,0.01,0.155,0.023,0.232,0.036c0.268,0.044,0.532,0.102,0.792,0.177c0.034,0.01,0.069,0.016,0.102,0.026
		c0.286,0.087,0.565,0.198,0.838,0.322c0.069,0.031,0.137,0.065,0.205,0.099c0.242,0.119,0.479,0.251,0.707,0.399
		C21.72,14.875,23,17.039,23,19.5c0,0.553,0.448,1,1,1s1-0.447,1-1c0-2.754-1.246-5.219-3.2-6.871
		C24.666,8.879,29.388,6.5,34.084,6.5c7.744,0,14.178,6.135,14.848,13.887c-1.022-0.072-2.553-0.109-4.083,0.125
		c-0.546,0.083-0.921,0.593-0.838,1.139c0.075,0.495,0.501,0.85,0.987,0.85c0.05,0,0.101-0.004,0.152-0.012
		c2.224-0.336,4.543-0.021,4.684-0.002C54.49,23.372,58,27.661,58,32.472C58,38.001,53.501,42.5,47.972,42.5H44
		c-0.552,0-1,0.447-1,1s0.448,1,1,1h3.972C54.604,44.5,60,39.104,60,32.472C60,26.983,56.173,22.06,50.975,20.694z"/>
	<path d="M31.708,30.794c-0.092-0.093-0.203-0.166-0.326-0.217c-0.244-0.101-0.52-0.101-0.764,0
		c-0.123,0.051-0.233,0.124-0.326,0.217l-7.999,7.999c-0.391,0.391-0.391,1.023,0,1.414C22.488,40.402,22.744,40.5,23,40.5
		s0.512-0.098,0.707-0.293L30,33.914V54.5c0,0.553,0.448,1,1,1s1-0.447,1-1V33.914l6.293,6.293C38.488,40.402,38.744,40.5,39,40.5
		s0.512-0.098,0.707-0.293c0.391-0.391,0.391-1.023,0-1.414L31.708,30.794z"/>
</g>

</svg>

  <span class="block text-grey">Drop your files here</span>
</div>
How to create a Dropzone with Tailwind CSS?
To create a Dropzone with Tailwind CSS, follow these steps:
Step 1: Create the HTML structure
The first step is to create the HTML structure for the Dropzone component. We will use a div element as the container for the Dropzone, and add a p element to display a message to the user.
<div class="border-2 border-dashed border-gray-400 rounded-lg h-64 flex flex-col items-center justify-center">
  <p class="text-gray-600">Drag and drop files here or click to upload</p>
</div>
Step 2: Add the Dropzone classes
Next, we will add the Tailwind CSS classes that define the Dropzone behavior. We will use the hover:bg-gray-100 class to change the background color of the Dropzone when the user hovers over it, and the flex-1 class to make the Dropzone fill the available space.
<div class="border-2 border-dashed border-gray-400 rounded-lg h-64 flex flex-col items-center justify-center hover:bg-gray-100 flex-1">
  <p class="text-gray-600">Drag and drop files here or click to upload</p>
</div>
Step 3: Add the file input element
To allow the user to select files to upload, we will add a file input element to the Dropzone. We will use the hidden class to hide the file input element, and the absolute class to position it over the Dropzone.
<div class="border-2 border-dashed border-gray-400 rounded-lg h-64 flex flex-col items-center justify-center hover:bg-gray-100 flex-1 relative">
  <p class="text-gray-600">Drag and drop files here or click to upload</p>
  <input type="file" class="hidden absolute inset-0">
</div>
Step 4: Add the JavaScript functionality
Finally, we will add some JavaScript code to handle the file upload functionality. We will use the addEventListener method to listen for the change event on the file input element, and then use the FormData object to create a new form data object that we can send to the server.
const dropzone = document.querySelector('.dropzone');
const fileInput = dropzone.querySelector('input[type="file"]');

fileInput.addEventListener('change', (event) => {
  const files = event.target.files;
  const formData = new FormData();

  for (let i = 0; i < files.length; i++) {
    formData.append(`file-${i}`, files[i]);
  }

  // Send the form data to the server using fetch or XMLHttpRequest
});
Conclusion
In this article, we have learned how to create a Dropzone component using Tailwind CSS. By using the pre-defined CSS classes provided by Tailwind CSS, we were able to quickly build a responsive and accessible user interface that allows users to upload files to a server. With Tailwind CSS, you can easily create custom user interfaces that match the design of your application, without having to write custom CSS code from scratch.